What is Xbox one error code e106?
Xbox one error code e106 is an error that usually occurs when the console does not function well or does not respond.
How can you fix Xbox one error code e106?
Some of the solutions to this error include clearing the cache and resetting your console.
Please see our in-depth walk-through solutions below.
1. Clear the cache
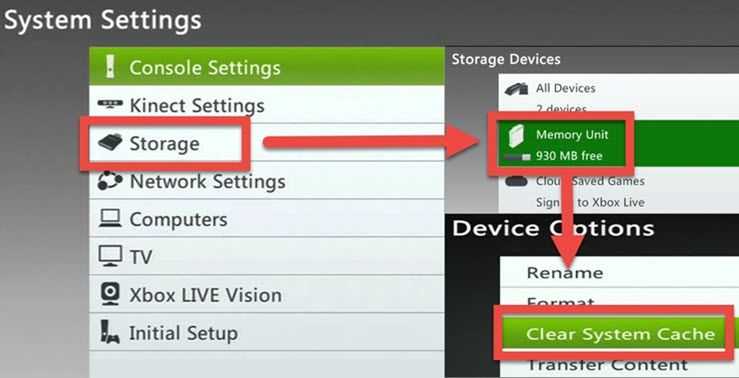
Xbox One error code e106 is a system error caused by data cache. Please turn off your device and unplug. Allow it to remained unplugged for one minute so the cache will be flushed from the memory. Then to make sure it works, use Clear System Cache function. Please see below.

- Press the Guide button on your controller.
- Go to Settings Tab, select System Settings ==> Select Storage.
- Select any of the listed storage device press Y on the controller.
- Select Clear System Cache.
- When prompted for a confirmation, select Yes.
2. Reset your console
An unsuccessful update on your Xbox could cause error e106. To resolve this problem, please reset your console.

- Turn off your Xbox One.
- Unplug it for at least 30 seconds.
- Plug it back, then press and hold Bind button (located on the left side of the Xbox One) and the Eject button.
- Then, power on the console without releasing the Bind and Eject button.
- Release the Bind and Eject button after two power-up beep sounds.
- After that, you should enter the Xbox Startup Troubleshooter.
- Then select the Reset this Xbox using the controller.
3. Reformat Xbox One Hard disk drive
Xbox One error code e106 could be due to a damaged firmware. Try to reformat it to fix the problem. See instruction below.

NOTE: You may want to test the Xbox One hard disk drive for any defect that may also cause the error. See this YouTube video on testing hard disk drive. replace the hard disk drive and use the instruction below to format the new hard disk so it will work on the console.
-
First, remove all HDD except for the HDD with installed Windows and remove all USB storage devices from the computer.
-
Connect the new HDD, and then turn on your Computer.
-
Download this tools on your PC osu1 and XBOX One Drive Replacement Preparation Script.
-
Go to Disk Management. Type “Create and format hard disk partitions” in Windows search and press Enter key.
-
Initialize the new HDD, select MBR (master boot record) and press OK.
-
Create a folder on your C:\ drive. Named it as Xbox.
-
Copy and extract the XBOX One Drive Replacement Preparation Script file you have downloaded.
-
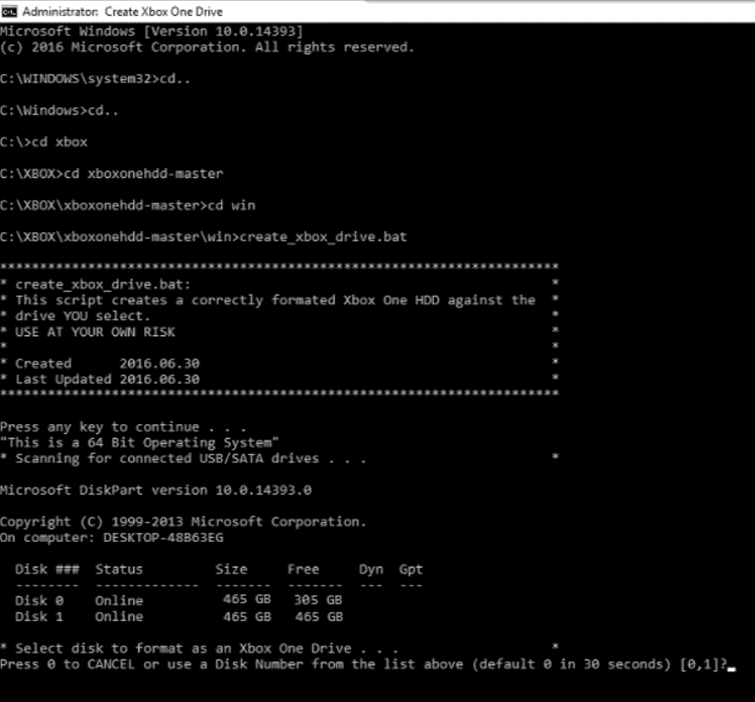
Open a Command Prompt. Type Cmd in the Windows search, right-click it and select Run as administrator.
-
In the Command Prompt type, cd and press Enter key twice and type cd XBOX and press Enter.
-
Then type cd xboxonehdd-master and press Enter key and then type cd win and press Enter key.
-
Type create_xbox_drive.bat and press Enter key.
-
Press the disk number of the new HDD.
-
Press Y to confirm the process to proceed.
-
Select the letter which corresponds to your HDD capacity in the standard.
-
Wait for the partitioning process to finish.
-
When finished, open a Windows Explorer click Windows button + E key, a 5 partition should be seen. The partition should be the same below.
Temp Content
User Content
System Support
System Update
System Update 2 -
Open System Update drive and create folders. Name it A and B.
-
Unzip the OSU1 you have downloaded. Copy host.xvd, SettingsTemplate.xvd, system.xvd, systemaux.xvd, systemmisc.xvd, and systemtools.xvd to the A folder from the System Update drive.
-
Copy the updater.vxd to the System Update drive.
-
Now turn off the computer and remove the new HDD.
-
Install the new HDD on your Xbox One.
-
Turn on your Xbox One, it should boot as a newly run Xbox One.
