What is Kernel_data_inpage_error Windows 10?
Kernel_data_inpage_error Windows 10 is an error that refers to a missing or corrupt page of kernel data in a Windows page file. It may be caused by corruption of a file, memory, or disk.
How can you fix Kernel_data_inpage_error Windows 10?
Some of the solutions to this error include testing the hard disk drive (HDD), testing the memory (RAM), and uninstalling the corrupt driver in safe mode.
Please see our in-depth walk-through solutions below.
1. Test Hard Disk Drive (HDD)
“Kernel_data_inpage_error Windows 10” accompanied with a blue screen of death (BSOD) may occur when a pagefile that is saved in the HDD could not be read by the system. It is possible that your HDD has a bad sector, which caused the damage to the pagefile. You might want to test your HDD but before performing the test, please reconnect the HDD cable because loss cable could also be the cause. Then, perform the check disk using Command prompt or use HDtune to test your hard disk.

NOTE: If you recently installed a driver and this error came up, you might want to check solution 3 first.
Option 1. Check Disk
- Click Command Prompt.
- A Command Prompt window will appear.
- Type in chkdsk /r.
- Wait until it is done.
- Windows will tell you if an error is detected or not.
- Consider HDD for replacement if the error is detected.
Option 2. Use HDtune
Test hard disk using HDtune, see this YouTube link here.
2. Test the Random Acess Memory (RAM)
A rare case, but it is also possible that a bad sector in the RAM may be causing "Kernel_data_inpage_error Windows 10." However, if the hard disk drive, upon checking was in good condition it could be caused by the RAM. You may want to test it to make sure but first, remove the RAM clean the gold pin of the RAM using an eraser then return it properly by pushing it in until the RAM slot lock snaps in place. Then, test it using Windows Memory Diagnostic, please see below for the instructions or see the link for a YouTube video tutorial.

Option 1. Windows Memory Diagnostic see YouTube link here
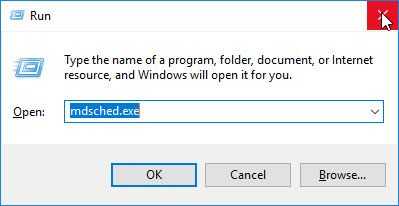
- Press "Windows key + R". The Run window will appear.
- Type "mdsched.exe" and hit enter.
- Once a window appears, click "Restart now and check for problems." NOTE: Computer will undergo reboot and the Windows Memory Diagnostics tool will appear. Leave the Computer to perform diagnosis until it reboots and returns to Windows Desktop.
Option 2. Memtest86 see YouTube link here
- Download Memtest86, see link https://www.memtest86.com/.
- Extract the downloaded file.
- Create a bootable USB using the imageUSB.exe that come with the downloaded file.
Step 1 ImageUSB.exe: Select the USB flash drive that you will use.
Step 2 ImageUSB.exe: Select Write Image to USB drive.
Step 3 ImageUSB.exe: Click Browser and then select the image name memtest86-usb.img that comes with the downloaded file.
Step 4 ImageUSB.exe: Click Write and then click Yes two times to confirm - When the process is done, restart your PC.
- When your computer starts, boot to your USB by clicking the function key that says "Boot".
NOTE: If you miss it, restart it again. - Then select your USB flash drive.
- Memtest86 will automatically start and will test your Memory / RAM for a defect.
- If a defect is found, replace the memory / RAM or if the warranty is still available, please claim it.
If the Windows Memory Diagnostic or the memtest86 finds an error, shut down the computer, switch your RAM into a different RAM slot on the motherboard and run the test again. If the error moves with the RAM, it is likely that it is a RAM issue. If the error only appears to a specific RAM slot, it is likely that the motherboard has a RAM issue. Swap physical memory as appropriate.
3. Uninstall corrupt driver in safe mode
A newly installed driver or Windows update may also cause “Kernel_data_inpage_error Windows 10.” You may want to uninstall it to fix the problem.

Option 1. For users who can not access Windows Desktop
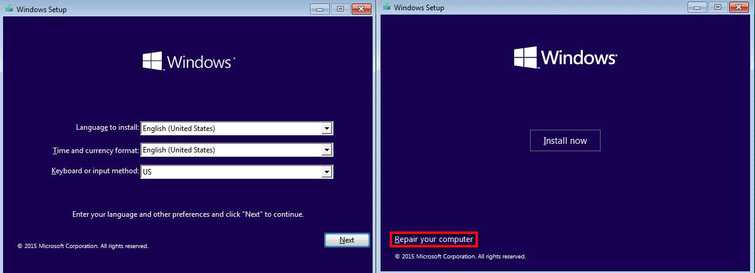
- Insert the Window 10 installation CD/DVD or USB.
- A message will appear “Press any key to boot from CD or DVD”, press any key to boot from the Window installation CD/DVD or USB.
- Select your language, time and keyboard, and click “Next.”
- Click Repair your computer.
Option 2. For the user who can still access Windows Desktop
Watch it here on YouTube.
- Hold Shift and Press restart.
- Or click the Windows button and Letter I at the same time, to direct you to Windows Setting and follow the image below.
In Advanced Option
- Click Troubleshoot ==> Advance Option ==>Start up Setting ==> Restart.
- Select from either numbers 4, 5 and 6 to enter safe mode.
- Now go to the Control Panel and select “Uninstall program.”
- Look for the newly installed driver that caused the BSOD and uninstall it.
- Restart your computer.
Here is a video demo on YouTube where Windows update was uninstall using Safe mode.
