What is error message 'Nvlddmkm.sys failed' in Windows?
Nvlddmkm.sys failed is a blue screen of death error that usually occurs to users who have a NVIDIA graphics card. When the driver that houses the graphics card becomes overloaded or exceeds its capabilities, users will get this blue screen of death error. The error may also manifest as, "Video TDR Failure", "nvlddmkm.sys failed", and "nvlddmkm.sys error."
Other possible reasons for this error include incorrect memory timings, incorrect voltages, driver conflicts, a corrupted driver, or a defective graphics card.
The error has been to occur in Windows 7, 8, and 10.
How can you fix 'Nvlddmkm.sys failed' in Windows?
Some of the solutions to this error include:
- Using Display Driver Uninstaller and installing the graphics card
- Turning off overclock settings
- Testing hardware
Please see our in-depth walk-through solutions below.
1. Use Display Driver Uninstaller and Install graphics card
Nvlddmkm.sys failed error is commonly caused by NVIDIA graphics driver, which could be out of date, incompatible with the Windows version, or incompatible with the graphics card. It is also possible that the cause is the remnant data of the uninstalled driver.

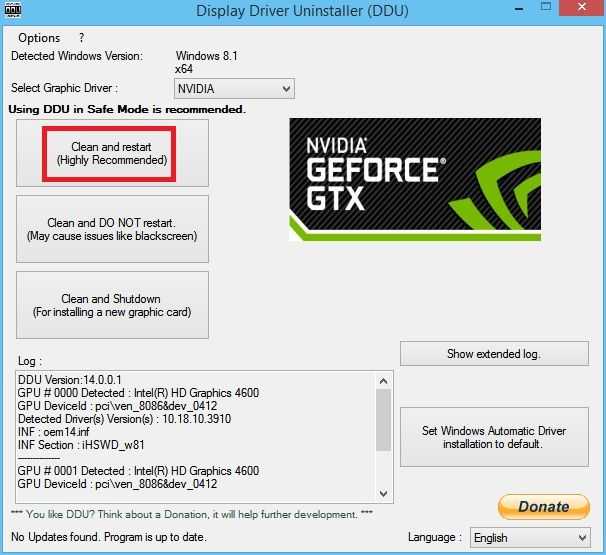
To fix this nvlddmkm.sys Bluescreen of Death, you may want to use the Display Driver Uninstaller (DDU) to completely clean your system with the old driver data. You may want to download the DDU, using this link here. To use DDU see instructions below.
- First, boot in "Safe mode."
Windows 7 or lower: Restart your PC. After the BIOS boot-up, continuously press the F8 key to access Advance Option.
Windows 8 and 10: Hold Shift key, then restart your computer using the power button in Windows Start. - In the Windows desktop in Safe mode, navigate to Display Driver Uninstaller.
- Run Display Driver Uninstaller.
- Select Clean and restart.
- When the process is done, it should restart.
After the restart, download and install the latest graphics driver for your graphics card that is also compatible with your Windows version. See link here. You could also use the "Autodetect your GPU" at the lower portion of the website.
2. Turn off Overclock Settings
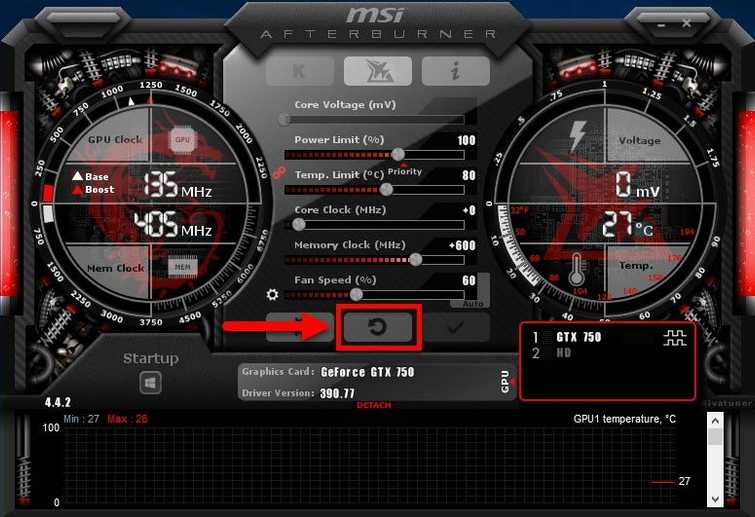
Overclocking or underclocking NVIDIA graphics card could also cause the Nvlddmkm.sys failed error in Windows. The overclock settings might be too high or the underclock settings is too low. To fix this problem, set your graphics card overlock/underclock settings to default or look for a sweet spot where your graphics card is comfortable with the overclock/underclock settings.

Additionally, when overclocking an NVIDIA graphics card, make sure the fan speed is set correctly to prevent the graphics from overheating.
3. Test Hardware
Nvlddmkm.sys failed error in Windows may also occur when a hardware component is defective. It could be the graphics card itself, the motherboard PCI-E slot, the power supply unit or the graphics card riser. Check each component for a possible defect. The first thing to do is to reconnect all components related to the graphics card to check for burnt components.
NOTE: Make sure both solution 1 and 2 are done.
Power Supply Unit
NOTE: Every PSU allocates it 20% wattage to itself. If you have a 750 watts, the 600 watts is the only usable wattage for your computer while the remaining 150 watts if for your PSU to run.
Make sure your Power Supply Unit(PSU) is could supply your graphics card needs when it is under full load. Do an internet search for the power requirement of your graphics card in full load. Then check if your PSU could supply it if so proceed with the test below.
Test your Graphics card
- Reconnect your graphics card properly and clean it if it is dusty.
- Use a spare HDD and install a fresh Windows operating system.
- Install an updated graphics card driver. If you're using a laptop with Intel CPU, install 1st the Intel HD graphics driver before the dedicated graphics card driver.
- Install a graphics card hungry game with benchmarks like GTA 5, Rise Of the Tomb Raider, Hitman 2016, Far Cry Primal and Ghost Recon Wildlands or watch it here on YouTube.
- Use the benchmark three times and wait until it finished.
- If no error was found, your Windows may have been causing the problem.
- For laptop and desktop (with one PCI-E x16 slot), if the BSOD restarts your PC, any display problem arises, or driver is failing, send it to the service center.
- For a desktop with two or more PCI-E x16 slots, use the other slots and then repeat step 5. If no error is found, the motherboard first PCI-E x16 slot may have a problem.
Please bring your unit to a service center or from the retailer for a warranty claim or for repair/ replacement.

