What is Bad pool header Windows 7?
Bad pool header Windows 7 is an error that usually occurs with the Windows memory allocation and is also accompanied by the blue screen of death.
How can you fix Bad pool header Windows 7?
Some of the solutions to this error include determining the cause, uninstalling the driver, fixing the register, testing the hardware, and reinstalling Windows.
Please see our in-depth walk-through solutions below.
1. Uninstall the Driver
"Bad pool header Windows 7" may be caused by a driver malfunction.You may uninstall the driver and install an update, which is compatible with your Windows 7 version and compatible with the hardware.

To uninstall a driver"
- Go to Control Panel and click Uninstall program.
- Look for the driver causing the error, then right-click it and select uninstall.
- If you could not determine what driver is causing it, you may uninstall all driver and reinstall it after using the latest driver release.
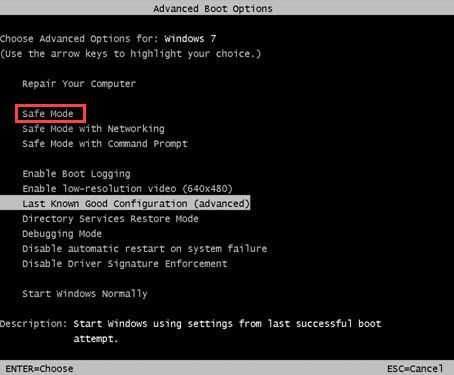
However, there may be a time when you can not access your desktop anymore due to "blue screen of death error code Bad pool header Windows 7." If you are experiencing this, please access safe mode to disable all drivers so Windows 7 would not send a stop code to deploy blue screen. To access safe, follow the instructions below.
- Restart the computer and continuously press F8 until you access Advance boot option and then select Safe mode.
- Now go to the Control Panel and select Uninstall program.
- Look for the newly installed driver that caused BSOD and uninstall it.
- Restart your computer.
2. Fix Registry
"Bad pool header Windows 7" may also occur if you have run a software, which directly configures your registry or disk-link library (DLL) files. Uninstalling that program, then applying the instructions below to restore missing or damaged registry and DLL files, may fix the error.

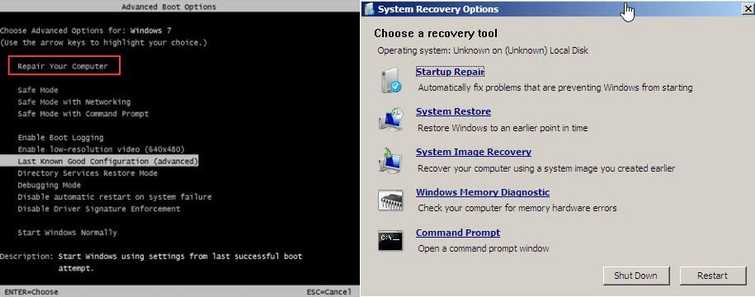
- Restart the computer and continuously press F8 until you reach Advance boot option and then select Repair your computer.
- In the System Recovery Options, select Command Prompt.
- Type "C:" press enter key ==> "dir"press enter key ==> "cd \windows\system32/config" press enter key ==> "mb backup" press enter key ==> "copy . backup"press enter key ==> "CD" regback" press enter key ==> "dir" press enter key ==> "Copy . .." press enter key ==> "A" (note: must be) Capital A press enter key.
- Then, close Command prompt and click continue.
3. Test Hardware
"Bad pool header Windows 7" may also occur due to a hardware problem. Windows 7 automatically sends a stop code "Bad pool header" so the hardware problem will do no harm to other peripherals. The only resolution for this error is to look for the hardware causing the problem. Test the hardware using the instructions below.

The first thing to do is to turn off the computer and unplug the computer from the power source and then follow the instructions below.
- Open the computer case.
- Remove all RAM stick and, clean the RAM gold pin using a pencil eraser and connect it again. Make sure that you push it down enough that the retention lever or the RAM slot lock snaps.
- Detach graphics card and other components, such as a printer and network adaptor.
- Reconnect hard drive. If you have multiple hard drives, do not connect the secondary hard drives, only the hard drive with installed Windows on it.
- Reset your Motherboard BIOS by removing the CMOS battery and reconnect it after one minute.
- Clean your CPU fan from dust and make sure the CPU fan cable is connected to the motherboard properly.
- Test the PC, turn it on. Check if the CPU fan is working. If not, buy a new one. If good, proceed.
- If it proceeds to Windows Desktop, turn it off again.
- Reconnect graphics card, secondary hard drive, and the other components. If the error occurs, your graphics card or add-on component might be the source of the BSOD. Reconnect it one by one and until you determine which one is causing the problem.
- If the error persists, please proceed below.
HDD test using Check Disk
Follow the solution 2 to access Command Prompt, if you could not access the Windows desktop. However, if you could, please type CMD in your Windows search, then right-click Command prompt and select Run as Administrator.
- In the Command prompt, type in chckdisk /r, then press Enter and wait until the process is finished.
- If you encounter any error report, such as the image above, consider replacing your HDD.
- If the HDD is in good condition, please see test your RAM.
RAM test
Using Memtest86
This solution is applicable even if you could not access Windows desktop. However, you are required a working PC to create a bootable Memtest86. If you do not have any spare PC to use, try using your PC if you could still access the Windows Desktop. If not, please skip Memtest86. Please see below for the instruction.
- Download Memtest86. Please see link http://www.memtest86.com/
- Create a bootable USB using the ISO image of MemTest86 or burn to a CD or DVD. A bundled software is included to create a bootable CD or USB.
- After you have created a bootable Memtest86, restart your computer and boot it to the USB or Disc drive.
- The Memtest86 will automatically test your RAM. If an error occurs, it will be in a red font. If memory is defective, consider it for a warranty claim or replacement.
Unit with one RAM stick
Move the RAM stick to another RAM slot on your motherboard.
If the error occurred only on a specific RAM slot, the motherboard RAM slot is defective. If your motherboard still has a warranty, please claim it. If the warranty is null, please use working RAM slot.
If the error follows the RAM using other RAM slots, the RAM is defective. If your RAM still has a warranty, please claim it. If the warranty is null, please buy a new one.
Unit with multiple RAM stick
If you have installed a new RAM stick and you encounter the error, it might be the source of the error.
If you have a multiple RAM, try to determine which one is causing the problem by using the RAM one by one and using only one motherboard RAM slot. If one of the RAM enables you to access Windows Desktop, please create a bootable Memtest86 or use Windows Memory Diagnostic to test your RAM. If the RAM passes the test please test another one. If one of the RAM encounters an error while the other pass, please claim warranty. If the warranty is null, please buy a new one or use the working RAM only.
If all of them fails using a same motherboard RAM slot, it is possible that the RAM slot is defective. If all of them pass the using Memtest86 or Windows Memory Diagnostic by using the same RAM slot, it is possible that one of the RAM slots is defective. Use the other RAM slots to confirm.
If the error persists, please install new Windows.
4. Reinstall Windows
If all the components are in good condition and "Bad pool header Windows 7" persists, please reinstall Windows. If you encounter a bad sector in the hard disk test from Solution 3 and decide to replace the hard disk, please be guided by the instructions below on how to install Windows.

- Insert the Window installation DVD or USB.
- A message will appear “Press any key to boot from CD or DVD”, press any key to boot from the Window installation CD/DVD or USB.
- Select your language, time and keyboard, and click Next.
- Click Install Now.
- Click I accept the terms of the license, and then click Next.
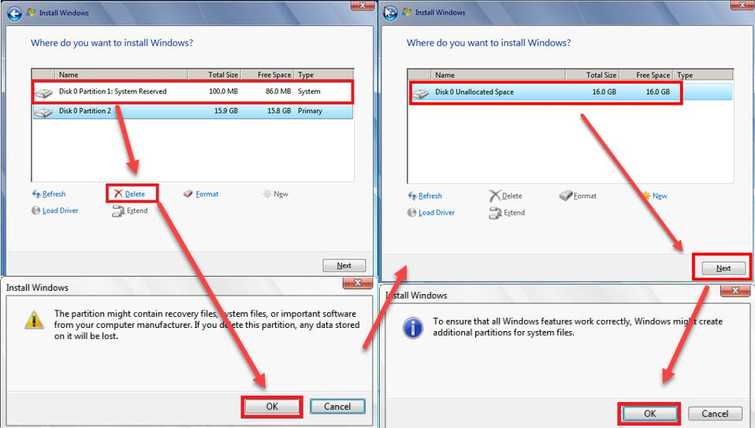
- Click Custom (Advanced).
- Select the partition, and click Delete.
NOTE: Delete all partition. - Select the Unallocated space and click Next. NOTE: If you want to define the size, click new, set the size and then click Apply.
- Click ok to confirm.
- Wait until the installation process is finished.
