What is 'Black screen error'?
Black screen error on Windows is an error that usually occurs to users after updating or restarting their computers. As suggested by the name, the error leaves the screen black and users unable to see icons on their desktop. The error may occur due to an external device or outdated display drivers.
How can you fix 'Black screen error'?
Some of the common fixes include:
- Waiting
- Reinstalling the display card driver
- Rolling back Windows 10
- Resetting overclock settings and increasing virtual memory
- Checking the hardware
- Resetting Windows
Please see our in-depth walk-through solutions below.
1. Wait
Black screen in Windows after a Windows update or installing a driver means that Windows is still in the process of installation, which may be causing the black screen display. This error on Windows desktop commonly appears when your computer has multiple graphics card or GPU. To fix this, simply wait for Windows to finish installing all your hardware driver.
2. Reinstall display card driver
Black screen in Windows may also be caused by a faulty display driver. It could be your graphics card drivers or the driver of your integrated display chip in your CPU or Motherboard. If your Windows has recently done a Windows update, the driver of the display might have been overwritten by the new update, which may cause the incompatibility of the driver or the hardware. If this is the case, see the instruction below.

NOTE: If you could not access Safe mode, it is possible that it is a hardware problem. See solution 5.
Step 1. Access Safe mode
You need to access safe mode to disable the display driver.
For Windows 7
- Restart your PC.
- Press F8 continuously after BIOS boot-up and before Windows boot up.
NOTE: Restart your PC if it fails. - Advance Option will appear, select Safe mode.
For all Windows
-
Insert a bootable Windows installer USB or DVD.
-
Turn on or restart the PC.
-
On the BIOS boot up, press the boot key provided by the BIOS loading screen.
-
Select the bootable device.
-
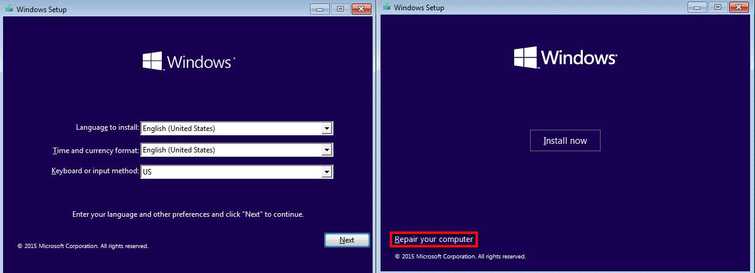
Select your language, time and keyboard, and click “Next.”
-
Then select Repair this computer.
-
For Windows 7, Advance Option will appear, select Safe mode.
For Windows 10, click Troubleshoot ==> Advance Option ==>Start up Setting ==> Restart.
Then Windows 10 Startup settings will appear, click number 4 key to access Safe mode.
Step 2. Uninstall the driver
- Go to Control Panel.
To access Control Panel, click Windows Start type Control panel and then press the Enter key. - Select Uninstall program.
- Browse for the Graphics driver.
It could be the following; NVIDIA Graphics Driver, AMD Software or Intel Graphics Driver. - Right-click the driver and select Uninstall.
- Restart your Computer.
Step 3. Install the Graphics driver
Before you install your graphics driver, make sure the driver software is the latest driver available. Also, make sure you are installing the correct graphics driver. For example, if you're using AMD graphics card with a model name RX 580, and you are using a Windows 10 x64, download the driver that is compatible with your Windows version and graphics driver model.
3. Roll Back Windows 10
Black screen in Windows desktop display that was caused by Windows update can be fixed by returning the Windows build to its previous version. To do this, see the instructions below.

NOTE: Currently (May 2018), the black screen display is due for the April Windows 10 update causing a black screen display to AMD graphics card. To fix this, roll back your Windows 10 to fall creator.
Step 1. Access Safe mode
See solution 2 how to access Safe mode.
Step 2. Roll back Windows 10
-
Click Windows Start, type Settings and then press Enter key.
-
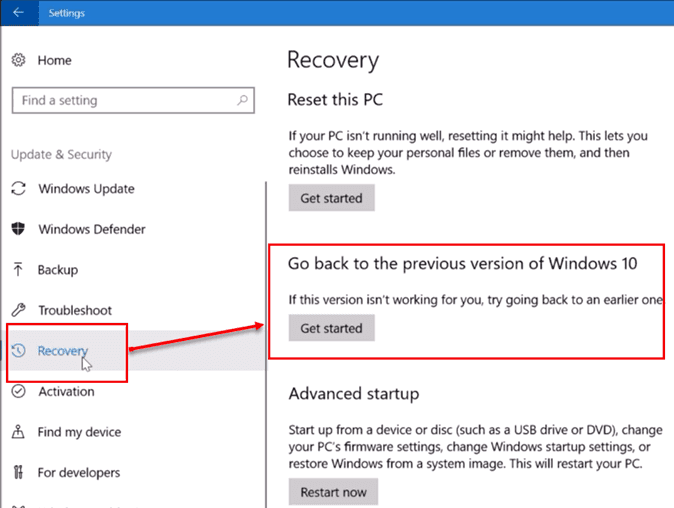
Click Update & Security and then click Recovery.
-
Below the Go back to the previous version of Windows 10, click Get started.
-
Then, a window will appear, please let it load.
-
Then, check for another reason, and then click Next.
-
Click No, thanks ===> Next ===> Next ===> Go back to earlier build.
-
The process might take long, please wait.
-
Optional: When Windows has rolled back to its previous version, reinstall your graphics driver.
4. Reset overclock settings and increase virtual memory
The black screen display while using your Windows desktop, might be caused by your overclock tool. Check your overlock tool if the settings too much, reset it to default if needed.
If the overclock tool is set to default, try to increase your virtual memory. High virtual memory is needed when running multiple GPU for crypto mining. See this YouTube tutorial here.
5. Check the hardware
Black screen in Windows may also be due to your hardware that is related to the display. This display hardware could be your graphics card, graphics card riser, motherboard PCI-E slot or your memory. To determine the cause of the black screen in Windows, see the guide below but make sure you have tried the solution above.
- Reconnect all hardware.
- Reset motherboard BIOS.
- If you’re using the graphics card for display, try to use the motherboard display port.
(If the display is ok, it means graphics card unit is undetected and may have a defect.)
If you're using the motherboard for display, connect a graphics card to your motherboard then connect the monitor cable to the graphics card.
(If the display is ok, it means the motherboard or the integrated graphics in the GPU is defective) - Test memory using this link here.
- Connect and test your hard disk drive to a working PC. See this YouTube video here how to test a hard disk drive.
For crypto mining rig
- Make sure your Power supply could handle the load of the GPUs
- Reset motherboard BIOS.
- Set BIOS to Gen2, IGFX, 4g Enable and enable mining.
- Connect display cable to the motherboard display output (DVI, VGA or HDMI).
- Reconnect all hardware. Connect the GPUs one by one.
6. Reset Windows 8, 8.1 or 10
If none of the above works, it is possible the cause of the “Black screen in Windows” might be the Windows system. To fix this reset your Windows to its original settings. An instruction below is provided or watch it here on YouTube.
- Click Windows Start, type in Reset this PC and press Enter key.
- In the Settings window, click Get Started.
- In the Reset this PC window, select from the following below:
Keep my files: If you want to keep your personal files.
Remove everything: Restoring Windows to default and all files will be deleted. - If you select Keep my files, click Next and then click Restart.
If you select Remove everything, select Only the drive where Windows is installed and then select Remove files and clean the drive. - The process may take time, please wait until it is finished.

