Windows 8.1 error codes are common because Windows 8.1 is a new operating system. Many users are still unfamiliar with how to use it, so errors are bound to happen. The most common error codes are 0x80070005 and 0x80244019. These codes happen when Windows 8.1 is unable to connect to the internet or to a specific website. The 0x80070005 error code means that there is a problem with the permissions that are set on your computer. The 0x80244019 error code means that there is a problem with the way that your computer is connecting to the internet. Both of these error codes can be fixed by making sure that your computer is connected to the internet and by changing the settings on your computer.
![Reinstall display card driver]() Windows 10Black screen error (Windows 10, 8.1 & 7)Black screen error on Windows is an error that usually occurs to users after updating or restarting their computers. As suggested by the name, the error leaves the screen black and users unable to see icons on their desktop. The error may occur due to an external device or outdated display drivers.
Windows 10Black screen error (Windows 10, 8.1 & 7)Black screen error on Windows is an error that usually occurs to users after updating or restarting their computers. As suggested by the name, the error leaves the screen black and users unable to see icons on their desktop. The error may occur due to an external device or outdated display drivers.![Do a Windows Update]() Windows 8 1TiWorker.exe high disk usage (Windows 10 & 8.1)TiWorker.exe high disk usage is an error that usually occurs when TiWorker.exe (Windows Module Installer Worker) is using too much system resources, causing your computer to slow down. You can see this when you open the Task Manager. It has been reported by users of Windows 10, 8.1 and 8.
Windows 8 1TiWorker.exe high disk usage (Windows 10 & 8.1)TiWorker.exe high disk usage is an error that usually occurs when TiWorker.exe (Windows Module Installer Worker) is using too much system resources, causing your computer to slow down. You can see this when you open the Task Manager. It has been reported by users of Windows 10, 8.1 and 8.
![Activate using Multiple Activation Key (MAK)]() Windows 8 1Windows Activation error 0x8007232B (Win 10, 8.1 & 7)0x8007232B is an activation error that usually occurs when trying to activate Windows. You might see this error if you entered a product key for the Enterprise edition of Windows to activate Windows 10 Home or Windows 10 Pro. You may also see this error if you're trying to activate your work PC but aren't connected to your workplace's network.
Windows 8 1Windows Activation error 0x8007232B (Win 10, 8.1 & 7)0x8007232B is an activation error that usually occurs when trying to activate Windows. You might see this error if you entered a product key for the Enterprise edition of Windows to activate Windows 10 Home or Windows 10 Pro. You may also see this error if you're trying to activate your work PC but aren't connected to your workplace's network.![Update driver and test graphics card]() Windows 8 1Windows Red Screen of Death error (Win 10, 8.1, 7, XP & Vista)Windows Red Screen of Death error (RSOD) is an error that may occur on your Windows laptop or PC when you are playing games, watching videos, booting your computer, or even updating your operating system. It has been reported on Windows XP, Vista, 7, 8, 8.1 and 10.
Windows 8 1Windows Red Screen of Death error (Win 10, 8.1, 7, XP & Vista)Windows Red Screen of Death error (RSOD) is an error that may occur on your Windows laptop or PC when you are playing games, watching videos, booting your computer, or even updating your operating system. It has been reported on Windows XP, Vista, 7, 8, 8.1 and 10.
![Activate KSM server using Multiple Activation Key (MAK)]() Windows ActivationWindows Activation error 0x8007007B (Win 10, 8.1 & 7)Windows Activation error 0x8007007B is an error that usually occurs when trying to activate Windows. You might see this error if you entered a product key for the Enterprise edition of Windows to activate Windows 10 Home or Windows 10 Pro. You may also see this error if you're trying to activate your work PC but aren't connected to your workplace's network.
Windows ActivationWindows Activation error 0x8007007B (Win 10, 8.1 & 7)Windows Activation error 0x8007007B is an error that usually occurs when trying to activate Windows. You might see this error if you entered a product key for the Enterprise edition of Windows to activate Windows 10 Home or Windows 10 Pro. You may also see this error if you're trying to activate your work PC but aren't connected to your workplace's network.![Test your hardware]() WindowsBSOD Driver_Corrupted_Expool error (Windows 10, 8.1 & XP)
WindowsBSOD Driver_Corrupted_Expool error (Windows 10, 8.1 & XP)
1. Restart your computer and try again
- On your keyboard, press the "F8" key repeatedly to open the "Start" menu.
- In the "Start" menu, click "Restart."
- On the "Restart Options" menu, click "Troubleshoot."
- Click "Advanced Options."
- On the "Advanced Options" menu, click "Startup Settings."
- Click "Restart."
- During the restart process, if you receive a "Windows 8 1 error code" message, follow the instructions that appear on the screen.
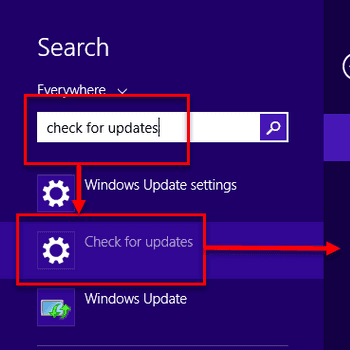
2. Check for updates and install any available Windows updates
- Open the "Windows Update" application.
- On the left-hand side, click on "Check for updates."
- On the right-hand side, under "Update type," click on "Windows Update."
- On the next page, under "Available updates," click on "Get updates."
- On the next page, under "Update settings," click on "Install updates."
- On the next page, under "Confirm installation," click on "Install updates."
- On the next page, under "Update status," click on "Processing."
- When the updates are installed, click on "OK."
- Close the "Windows Update" application.
3. Run the Windows 8.1 Troubleshooter
- Open the Windows 8.1 Start menu.
- In the Search box, type troubleshoot.
- In the results, click Troubleshoot.
- In the Troubleshooting Options window, click Advanced.
- In the Advanced Troubleshooting Options window, click Win8 Error Reporting.
- In the Win8 Error Reporting window, click Start.
- In the Start Troubleshooting window, click Advanced Options.
- In the Advanced Options window, click Services.
- In the Services window, click the service you want to troubleshoot.
- In the Service window, click the Start button to start the service.
- If the service starts, click the Stop button to stop the service.
- If the service does not start, click the Start button to start the service again.
- In the Service window, click the Status button to view the status of the service.
- If the service is not running, click the Start button to start the service.
- In the Service window, click the End button to view the end of the status information.
- In the Status window, click the Details button to view the detailed status information.
- If the service is not running, click the End button to view the end of the status information.
- In the Status window, click the Check button to check the status of the service.
- If the service is not running, click the Check button to check the status of the service.
- If the service is not running, click the End button to view the end of the status information.
4. Reset or refresh your Windows 8.1 installation
- Press the Windows logo key + X on your keyboard to open the Start screen.
- In the search bar, type "reset" and press Enter.
- Click the "Reset this PC" button on the top left.
- Click the "Advanced options" button on the next screen.
- Click the "Reset" button on the next screen.
- Click the "Erase everything" button on the next screen.
- Click the "Yes" button on the final confirmation screen.
- Restart your computer.
5. Uninstall recently installed programs or updates
- In Windows 8, search for "Control Panel" using the Start button and type "Control Panel" in the Search results.
- Once you find the Control Panel, double-click on "Programs and Features".
- On the Programs and Features screen, under the list of installed programs or updates, right-click on the program or update and choose "Uninstall".
- If the program or update is not installed on your computer, you may be prompted to install it before you can uninstall it. Click on "Yes" to install the program or update.
- After the program or update has been installed, repeat the steps to uninstall it.
Still not working? maybe try one of these options:
- Restore your computer to an earlier point in time.
- Perform a clean boot of your computer.
- Run the System File Checker tool.
- Run the DISM tool.
- Contact Microsoft support for further assistance.

