DNS server not responding in Windows 10 is an error that occurs when the Domain Name Server is unable to translate the web address into the IP address for the browser to connect to. When it happens you are unable to access any website even if your DNS settings are correct.
The error may manifest as "The DNS server isn't responding. Your computer appears to be correctly configured, but the device or resource (DNS server) is not responding.
Common solutions to DNS server not responding
Some of the common fixes include:
- Setting DNS address to automatic
- Checking the router or firewall
- Resetting network configuration
Please see our in-depth walk-through solutions below.
1. Set DNS Address to Automatic
DNS server not responding on Windows may be due to the static DNS server in your network configuration. Check your DNS address in your network configuration and then set it to automatic. See instructions below.

- Click Windows Logo Key + R key to open run.
- Type ncpa.cpl and press the Enter key.
- Right-click your connection, and then select Properties.
- In the Properties window, click Internet Protocol Version 4 (TCP/IPv4 ) to highlight and click Properties.
- Enable Obtain an IP address automatically.
- Enable Obtain DNS server address automatically and then press OK.
- Next, click Windows Start, in the search bar type CMD.
- Right-click Command Prompt and select Run as Administrator.
- In the Command Prompt window, type ipconfig /flushdnsand then press Enter key.
- Restart your PC.
2. Check router or firewall
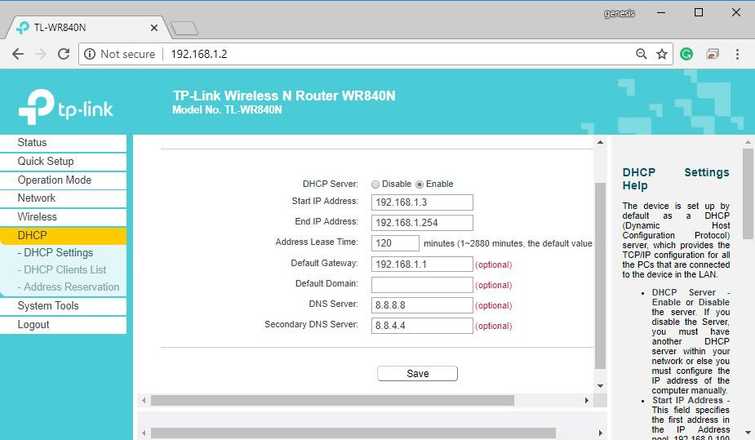
If "DNS server not responding on Windows" still persists, the DNS might be configured in the router or on a firewall. To fix this access your router or firewall and then remove the set DNS server address and set it to automatic or input a public DNS server address such as Google public DNS 8.8.8.8 and 8.8.4.4.

NOTE: If you are connected to a private network such as school and office, you might want to ask for assistance from the IT admin.
- Run a web browser Ex. Google Chrome, Firefox or MS Edge.
- Type the Gateway IP address or the Router IP address. a. To know your Gateway, click Windows Start, type CMD, and press Enter key. b. Then in the Command prompt type ipconfig /all and then press Enter key. c. Look for Default Gateway.
- Browse for your DNS server setting in the router.
- Input Google Public DNS which is 8.8.8.8 and 8.8.4.4 or leave it blank.
- Then, Save.
- Then, power cycle your router. Unplug it for at least 30 seconds.
- Right-click Command Prompt and select Run as Administrator.
- In the Command Prompt window, type ipconfig /flushdnsand then press Enter key.
- Restart your PC.
3. Reset Network Configuration
If the router is already set to automatic obtain DNS server address but the "DNS server not responding” still appears, try resetting the network configuration of your Windows. See this YouTube video instruction.
- Click Windows Start and type CMD.
- Right-click the Command prompt and select Run as Admin.
- In the Command prompt, type netsh winsock reset and press Enter key.
- Type netsh int IP reset and press Enter key.
- Type ipconfig /release and press Enter key.
- Type ipconfig /renew and press Enter key.
- Type ipconfig /flushdns and press Enter key. 8. Restart your PC to apply the changes.
If none of the solutions work, you might check your smartphone for internet connection. If the connection fails, you may want to call your internet service provider. The problem might be on their side or the modem router they provided.

