If you see "No SIM" or "Invalid SIM" on your iPhone or iPad (Wi-Fi + Cellular), make sure that your SIM card is in your device. If you can't find your SIM card, contact your carrier.
If you get this error after updating your device to iOS 13, insert your SIM card from another device or try to restore your device from a backup. If you can't do either of those things, contact your carrier.
This error can also happen if your SIM card is damaged or if it's not inserted in the SIM tray correctly.
What is iPhone error no sim card?
iPhone error no sim card is an error that usually occurs if the sim card used is not from the specific network the device is currently locked with. Some of the solutions to this error include testing the sim card and iPhone and resetting the network settings.
1. Test Sim card and iPhone
There is a possibility that the cause of "iPhone error no sim card " is caused by the Sim or the Sim slot. You may want to do the test below to verify the problem.

-
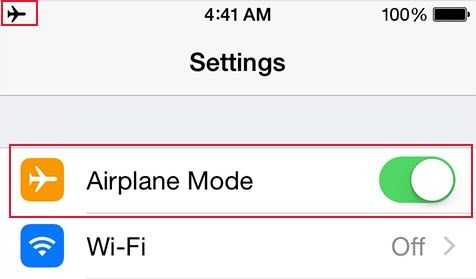
Make sure you are not in Airplane mode. An airplane logo will be displayed above if it is on.
-
Restart your iPhone.
-
Turn off the iPhone reconnect the SIM.
-
Try using another SIM card, if it works the SIM card has the problem.
-
If not update your iPhone to the latest version of iOS.
-
If none of the above works, the SIM slot or a hardware might have failed.
-
Other causes might be your iPhone does not support Sim Brand.
If the SIM is the problem, ask for an assistant from your network provider. If the iPhone is the cause, please send your phone to the closest Apple service center.
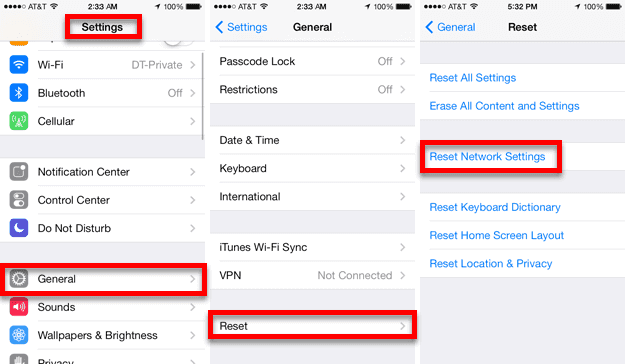
2. Reset Network Settings
“iPhone error no sim card” could be caused by an undetected sim. You may want to try resetting your Network settings to fix the error.

- Go to Settings > General > Reset > Reset Network Settings**.
** - Enter your password.
- Press Reset network settings.
- The phone will automatically reset.
- Then, try to send a message using a 10 digit number again.
3. Restart your iPhone
- Open the Settings app on your iPhone.
- Select General and then Reset.
- Tap Reset All Settings.
- Enter your passcode if prompted.
- When the reset is complete, return to the Settings app and select General.
- Select Reset and then Erase All Content and Settings.
- Tap Erase.
- Enter your passcode if prompted.
- When the reset is complete, your iPhone will restart.
4. Check for a carrier settings update
Settings > General > About > Carrier. If the carrier is listed then there is a new update available. If the carrier is not listed then the update is not available. If the carrier is listed then you will need to download and install the update.
5. Update your iPhone to the latest version of iOS
- Open Settings on your iPhone and select General.
- Scroll down to update and tap on it.
- If you are connected to a Wi-Fi network, your iPhone will search for the latest update and download it automatically. If you are not connected to a Wi-Fi network, you will be prompted to connect to a network before the update can be downloaded.
- Once the update is downloaded, your iPhone will begin to update.
- Once the update is complete, your iPhone will restart and you will be presented with the update notification. Tap on it to start the update process.
- Once the update is complete, your iPhone will be updated to the latest version of iOS.
6. Make sure that your iPhone is using the latest version of its carrier settings
- Open the Settings app on your iPhone.
- Tap General.
- Tap About.
- Tap Software Update.
- If an update is available, tap Download and Install.
- Your iPhone will start the update process.
- Once the update is complete, your iPhone will restart.
- You will now be using the latest version of your carrier settings.
7. Check for any debris or damage around the SIM card slot
The first step is to try and use another SIM card if possible. If the problem persists, you'll need to take your phone to a service center to have the SIM card slot checked for any debris or damage. If there is no debris or damage, the phone may just need to be reset.

